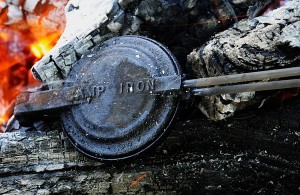
 Bush pies have been a family favorite ever since I was a kid. Simple in design, “pie irons” allow you to make a toasted sandwich over a campfire by encapsulating the ingredients between two pieces of bread*. The variety of bush pie ingredients is only limited by the imagination, though we typically make some variation of a pizza bush pie as a main course and either pie filling or thickened local berries for dessert.
Before you run out and buy a bush pie iron of your own be forewarned that not all irons are created equal. Some irons look like they may work but if they are called hamburger cookers they are too deep and the bread will not seal properly. Likewise, I have used square irons with equally disappointing results. The best shape is a slightly domed round pie iron (see photo) made of either aluminum or cast iron. Aluminum is preferred for camping because it’s both light weight and low maintenance. Cast iron pie makers heat evenly and produce a nice final product. They are great around a campfire at home. Like any cast iron cookware they do need to be seasoned properly as well as cleaned and dried after each use to prevent rusting.
So now for the good stuff. Prepare your ingredients in advance, so you can cook while the irons are hot. Evenly butter the bread and place the buttered sides together on a plate. I have included some suggestions below for pizza and dessert bush pies but feel free to experiment. Once the ingredients are ready it is now time to preheat the pie irons. Place a small amount of margarine in the iron and place over the fire for a minute or two. The hot iron will quickly melt the margarine allowing you to “season” the inside surfaces (this helps prevent the bush pies from sticking to the irons). Once hot, open the pie irons and place a piece of bread on the bottom with the ‘buttered’ side down. Next place your ingredients in the center of the piece of bread (careful not to overfill – if you do the toppings will ooze out the sides and create a big mess). Finally place the second piece of bread on the top with the ‘buttered’ side up. Close the iron and remove the overhanging bread crusts with a butter knife. The crusts can be saved to be used in a stuffing at a later date or your faithful dog may decide that he is deserving of such a treat (your choice). Place the iron in the hot coals on the edge of the fire and check often to prevent burning. After you have made a couple of bush pies you will get the hang of how long it takes. Once the bread has toasted to the desired colour remove the bush pie and repeat (I am usually cooking my second, or third, or… well we won’t go there, while eating the one just out of the iron!).
WARNING – Bush Pies are Extremely Delicious! You may consume more than you intend. If this happens do not count up how many pieces of bread you just ate! Do not think about how many calories you just ingested! Just sit back and relax (undo the button on your pants if you have to) and enjoy one of life’s little pleasures – the humble little bush pie.
Basic Ingredients
- Bread* – (nothing fancy) – sandwich loaves work great
- Margarine
- Fillings
Pizza**
- tomato sauce
- ham or ground venison (cooked) or sausage
- pineapple chunks
- cheese (pizza mozza works great)
- sliced fresh mushrooms
Dessert
- cherry pie filling; or
- saskatoons, raspberries, sour cherries, peaches, etc. thickened and sweetened to taste; or
- marshmallows and chocolate chips (Black Forest Bush Pie Recipe)
*Note my wife also makes a gluten-free pancake that can be substituted for the bread (send me a message if you would like the recipe).
** Before we go camping we prepare the ingredients and combine them all together. The mixture is frozen into meal sized portions. We normally plan on having bush pies a day or two into our trip. By that time the pizza filling has thawed and is ready to use by simply scooping the desired amount onto the bread.
A bush pie is really much more than the sum of its parts and it really does taste much better than the name might imply! Give them a try at your next campfire.

I prepare the fillings: diced slices of sandwich meats (ham,peperoni,summer sausage,salami,and bacon) + (onions,green peppers,mushrooms) + grated Mozza cheese, all are put into ziplock bags. I find this the best then everyone can make their own ( especially the kids) to taste.
Great tip Kim. Thanks!
Oooh! Your wife’s gluten free pancake recipe would be awesome! Could you please send it to me? I would love to try it out at the lake this weekend 🙂
You bet – I’ll send it to you right away. The gluten free recipe has had a lot of interest. Watch for my post on gluten free bush pies next week. Hope you enjoy them this weekend!
And here it is…a gluten free bread substitute for bush pies – Gluten Free Pancakes